My First Fondant Cake - A Very Moist Yellow Cake and Swiss Meringue Buttercream


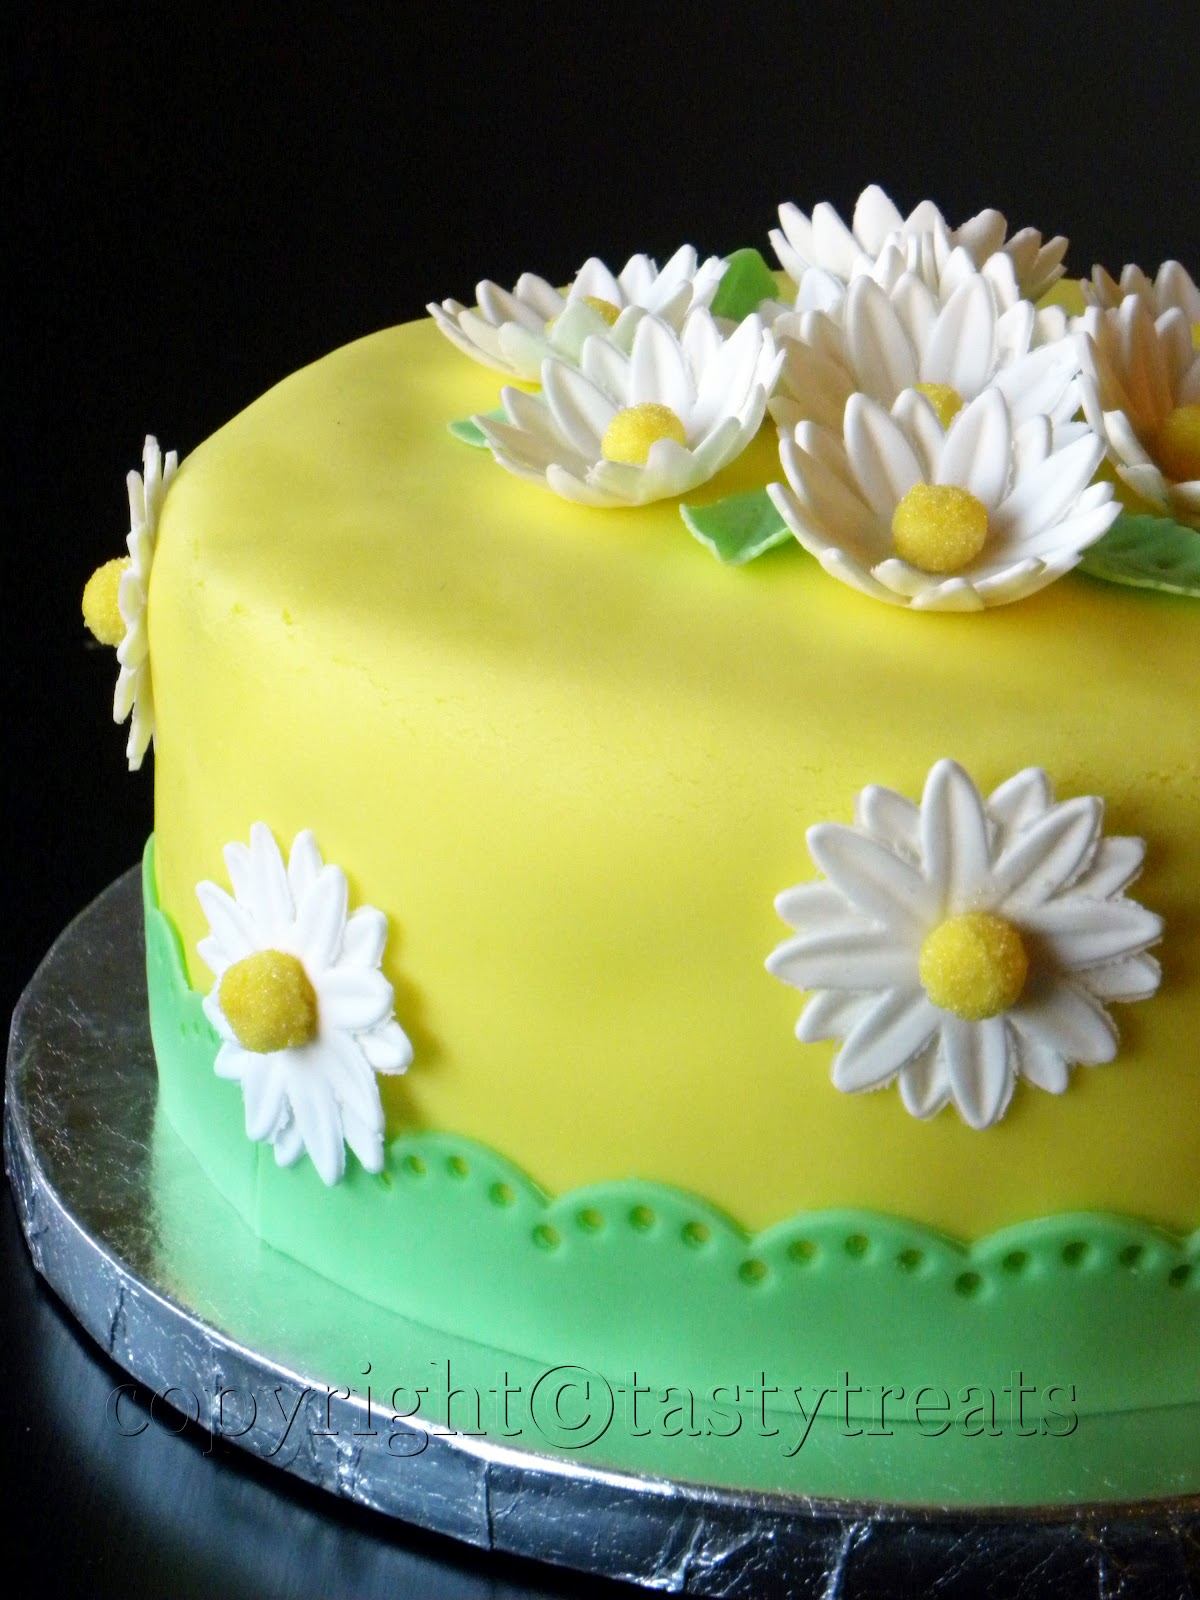
The third course at Wilton is completely focused on fondant. If you liked playing with clay as a kid, or if you still like to, you will have a lot of fun working with fondant! From what I've read, I've realized that there are fondant lovers and haters out there and I believe I belong somewhere in between. I love the things you could do with fondant, but am not very fond of the taste. You could always peel of the fondant and eat the deliciousness under it. I don't think I would  make a fondant cake for myself, but to create something fun and whimsical for kids, fondant is the way to go! It is a little challenging to work with, but it's also a whole lot of fun and the possibilities are endless.
I was busy with a few other things during the week of the final class, so I stuck with a very basic design and made the easiest flowers among the ones we had learned. We had to take a buttercream iced cake to class, which we then covered in fondant. To me covering the cake was the most challenging part and a hundred things went wrong when I was doing it. The good thing is you can cover most of your mistakes with a strategically placed decoration :). I had rolled my fondant way too thick and there were a lot of cracks, you can still see the ones on the top edge of the cake. But for my first time, I think I did OK.
For the cake, I tried this recipe that I've had bookmarked for a long time and its one of the best cakes I've ever made. It was incredibly moist and delicious! Another thing I tried was the Swiss Meringue Buttercream (SMB) and its now my favorite frosting! SMB is not cloyingly sweet like the regular buttercream. It builds its structure from the whipped egg whites (don't worry, the egg whites are heated to a point where they are safe  and not raw), instead of sugar, making it just sweet enough for a frosting and it's easy to work with too!


Moist Yellow Cake
Ingredients
1 cup butter, at room temperature
2 cups sugar
4 eggs, room temperature
3 cups sifted self raising flour
1 cup whole milk, room temperature
1 tsp vanilla extract
1/2 tsp butter flavoring (I skipped this)

Method:
Preheat oven to 350 F. Grease and line (3) 8" pans (I used only 2).
Beat the butter until light and fluffy. Add the sugar and beat for about 7 mins.
Add eggs one at a time and beat well after each addition.
Add flour and milk, alternating, beginning and ending with flour.
Add vanilla and butter flavoring and mix just until combined.
Divide the batter among the pans. Tap the pans on your counter to remove any air bubbles.
Bake for about 30 mins or until done.
Cool in pans for 10 mins.
Remove and immediately wrap each cake in plastic wrap to seal in moisture.
Cool completely on wire racks.
Once cool, remove from plastic and level the cakes. Fill and frost as desired.
Recipe from Bakerella


Swiss Meringue Buttercream
Ingredients
(to fill and crumb coat an 8", 2 layer cake)
2 egg whites
1/2 cup sugar
12 tbs butter, softened but cool
1/2 tsp vanilla

Method:
Make sure your bowl, whisk and all other tools you use to make the meringue are completely free of any grease. Take the egg whites and sugar in a big metal bowl and place the bowl over a pot of simmering water. Whisk gently but constantly until the mixture reaches a temperature of 140 degrees F on a candy thermometer, or until the egg whites are hot and you cannot feel the sugar granules when you rub the mixture between your fingers. 
Remove from heat and whip the hot mixture, until it turns thick and glossy and white and and about doubles in volume. The bowl will be neutral and not hot at this point.
Then add the butter, a few tablespoons at a time, mixing continuously until it has a silky smooth texture. The mixture may look curdled at some time, but just keep mixing and it will come together soon! Mix in the vanilla.
For more details on SMB read this post at Sweetapolita.

Chocolate Sorbet


You really cannot ignore Valentines Day, even if you want to. The TV, internet and every store will serve as a constant reminder. I was at Costco yesterday and almost every shopper had a bouquet of flowers or a big box of chocolates in their cart. I probably was the only exception and I almost went back to get some chocolates for myself, almost! We look at Valentine's Day and all such other 'Days' as an excuse to splurge, on food that is! Going out was not an option this year, so I had planned to make some of our favorite dishes at home. The little one however had her own plans and decide to skip her nap today, Manoj was held up at work and got home really late. All I could make was a quick pasta dish. Dessert, which had to be chocolate, was already made over the weekend. 
I love all kinds of fruit sorbet but I was a little hesitant to try this, wondering how chocolate and water, considered to be enemies, would work together. But the resulting mixture was heavenly, so incredibly chocolaty. We even had a couple of shots of it before it went into the ice cream machine. Besides a sorbet makes me feel good, atleast I am avoiding the cream. If you are chocolate crazy like me try this, I promise you'll love it!

Chocolate Sorbet


Ingredients:
2 1/4 (555ml) cups water 
1 cup (200 gm) sugar
3/4 cup (75 gm) unsweetened cocoa powder
pinch of salt
6 oz (170 gm) bittersweet/ semisweet chocolate, finely chopped
1/2 tsp vanilla extract


Method:
Use a large saucepan, or the mixture will boil over.
Mix together 1 1/2 cups water, sugar, cocoa and salt in a large saucepan and bring the mixture to a boil, whisking frequently. Let it boil, continuing to whisk, for 45 seconds.
Remove from heat and add the chocolate. Stir until it melts completely and then stir in the vanilla and remaining water. Transfer the mixture to a blender and blend for 15 seconds.
Chill the mixture thoroughly and then freeze it in your ice cream machine as per instructions. 
If the mixture has become too thick to pour into your machine, just whisk it thoroughly to thin it out.
Transfer the sorbet into a container and put some plastic wrap on it touching the sorbet. Then cover with the lid and store in the freezer.
Recipe from Smitten Kitchen.

Easy Chicken Curry


We have chicken about twice a week and its usually a dry dish we can can have with dal rice. I prefer quick stir fry dishes than the ones with a rich curry. But sometimes I really want gravy, to dunk some bread in it and enjoy the soggy goodness. On such days I usually cook something like this dish. Its very easy to prepare, using basic everyday ingredients. It's looks rich, but is actually a very light and flavorful curry.

Chicken Curry


Ingredients:
1 whole chicken, about 2 lbs, cut into small pieces
1 big onion, sliced
5-6 red chilies or to taste
3 big garlic cloves, grated
2 tbs ginger, grated
2 tomatoes, chopped
1/2 tbs garam masala
1 tbs kasoori methi (dried fenugreek leaves), crushed
1 tsp cumin powder
2 tsps coriander powder
2 tbs yogurt
salt to taste
big squeeze of lime
1/4 tsp turmeric powder
2 tbs oil


Method:
Mix the yogurt, grated ginger and garlic, turmeric powder and salt and marinate the chicken in this mixture for atleast 30 mins.
Heat 1 tbs oil in a pan, add the red chilies and fry for a few seconds. Then add the onions and saute until golden. Add the tomatoes and cook until soft and mashed.
Grind this mixture into a fine paste.
Heat the remaining oil on medium heat. Add the dry spice powders and heat for a few seconds. Add the ground paste and mix well. Cook for a couple of minutes.
Add the chicken and kasoori methi and mix well. Add about half a cup of water and bring to a boil.
Reduce the heat, cover and cook until chicken is tender. Adjust the seasonings and the consistency of the gravy. Squeeze some lemon juice into the curry and mix well. Remove from heat and serve hot.

Eggless Chocolate Cake with Chocolate Buttercream...for Wilton Course 2


Although I bake a lot of cakes, I have never really paid much attention to decorating them. But my daughter's second birthday is coming up soon and I want to make something special for her. I thought it would be great to learn something new, so I finally enrolled for the Wilton course last September.
I made this chocolate cake for the final class of course 2. We worked with royal icing and it was really fun. Royal icing dries up hard and the flowers look lovely! I made about 75 flowers for the final class, couldn't stop myself, that's how much fun I had making them. Another thing I learned was the basket weave design, it takes some patience but so worth it!


The cake had to be covered in buttercream but I did not want to use the wilton buttercream as its made of shortening and I did not like it at all. So I googled and found this amazing recipe for chocolate buttercream at BakedBree and it tasted absolutely divine. This buttercream is great for piping too and you can do all sorts of designs. The only challenge is doing it quickly or the warmth from your hands will make it soft, making it very difficult to work with. One trick is to fill the piping bag with only a little icing at a time and refilling as you go.


This is the cake I made for the final class of course two. It was a small 6" cake. The chocolate cake recipe is from Tarla Dalal. I doubled the below recipe to make two cakes. I had some batter leftover after filling two pans about 2/3's full, so next time I will probably divide the batter among three pans and make a triple layer cake. I filled the cake with a thin layer of buttercream and some strawberry preserves and crumb coated the cake before doing the basket weave. Decorated it with a few royal icing flowers. This was a cake I was really happy with!

Eggless Chocolate Cake
Ingredients:
2 tbs cocoa powder
1 cup all purpose flour
1 tsp baking powder
1/2 tsp baking soda
200 gms condensed milk
1/2 cup butter, melted
1/2 cup water
1 tsp vanilla extract

Method:
Preheat the oven to 350F/ 180C. Grease and dust a 6" pan.
Whisk all the dry ingredients together to combine. Whisk all the wet ingredients together in another bowl and add to the dry ingredients.
Stir just until combined. Pour into the prepared pan and bake till done. Check after 25 mins. Mine took a little longer.
Cool in the pan for 10 mins and then remove onto a wire rack and cool completely.

Eggless cakes sometimes are not very moist, so I followed this idea from Bakerella. I wrapped the cake in plastic wrap as soon as I took it out of the pan, when still hot. Then cooled it completely on the wire rack. You won't believe how moist the cake was.


Chocolate Buttercream
Ingredients:
1 cup (two sticks) of unsalted butter at room temperature
2 1/2 cups confectioners sugar
3/4 cup cocoa powder
1 tsp vanilla extract
2-3 tbs heavy cream or milk (cream is better)

Method:
Cream the butter and sugar till light and fluffy.
Add the cocoa powder gradually on low speed.
Add just enough cream to get the buttercream to a spreading consistency.
Add the vanilla.
Ice your cake as needed.

The buttercream for the basket weave has to be really stiff so I took some aside before adding the cream to the  rest of it, that I used to fill and crumb coat the cake.


This goes to Let's Cook - Sweet Somethings and Chocolate Mela